


Illuminator Aubrey's Gauntlets are Heavy Arms in Lords of the Fallen (LotF). Illuminator Aubrey's Gauntlets are part of the Illuminator Aubrey's Set, it is a heavy armor piece that was released in Patch v.1.1.414 or part 2 of the "Season of Revelry". Players must complete a unique quest to acquire the radiance armor set.
Where to find Illuminator Aubrey's Gauntlets in Lords of the Fallen
The Illuminator Aubrey's Gauntlets can be found at:
We recommend doing the following steps to acquire the Illuminator Aubrey's Set in Lords of the Fallen:
Step 1: Acquire the Flickering Flail at the Tower of Penance.
- If you've defeated Tancred, you'll already have Tancred's Key in your inventory. If not, you must fight him for the key to drop. Once you're back at the boss arena, approach the shrine and go right to find a prison cell that can now be unlocked using the key. Inside, you'll find the Flickering Flail weapon.
Step 2: Find the 1st Shrine and Complete its Objective
PLEASE TAKE NOTE THAT FINDING ALL 6 SHRINES CAN BE COMPLETED IN ANY ORDER. AND TO COMPLETE THE OBJECTIVE OF EACH SHRINE, THE PLAYER MUST KILL THE ENEMY WITH THE FLICKERING FLAIL THAT IS IMBUED WITH THE RADIANT WEAPON SPELL. AND FINALLY, MAKE SURE THE SPELL IS ACTIVE UPON LANDING THE FINAL BLOW.
- The first shrine can be located at the Tower of Penance. Before leaving the area, retrace your steps the way you came in from Tancred's boss arena to find a shrine lit with multiple candles and has a statue of a breaded man wearing a hood. To formally activate the questline of the first shrine, the player must use the Orian Vow of Protection gesture in front of it. If you do it in front of the first statue, a message will appear that says "Illuminate 5 Carrion Knights to end their suffering".
- NOTE: If you do not have the Orian Vow of Protection gesture, you can automatically acquire it just by interacting with the Shrine of Orius at Skyrest Bridge.
- The solution to completing the objective is to kill 5 Carrion Knights with the Flickering Flail while it is buffed with the Radiant Weapon spell. Luckily, the easiest way to find and kill the Carrion Knights is at the Tower of Penance. You can find them as you drop down each level of the tower. Just take note that the Radiant Weapon spell is active upon landing the final hit that kills the enemy, otherwise, it won't count.
- After completing the objective, head back to the shrine at the bottom of the tower and interact with it. If you've completed it, a message should appear that says "In Radiance, they found eternal rest".
Step 3: Find the 2nd Shrine and Complete its Objective
- For the second shrine, players can locate it in the same room where you acquire Abbot Vernoff's Key, which is at the Manse of the Hallowed Brothers.
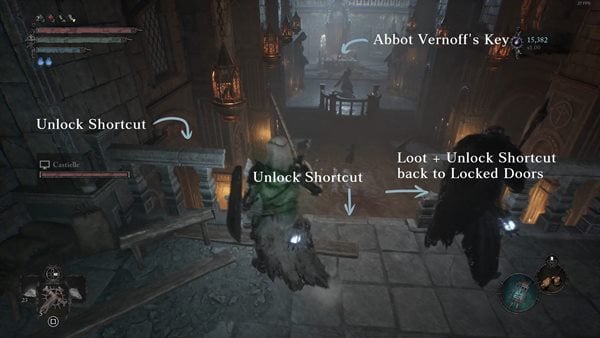
- Interact with the tall statue at the center by using the Orian Vow of Protection gesture in front of it. This reveals another objective which is to "Illuminate 10 Crimson Rectors to end their suffering"
- The Crimson Rector enemy luckily can be located in the same room where the shrine is. You just need to rest at a nearby Umbral Flowerbed for the enemy to respawn after killing it. Again, make sure to equip the Flickering Flail weapon, imbue it with the Radiant Weapon spell, and make sure the final blow comes from the weapon that has the buff effect active.
- Once you complete the objective, return to the statue and interact with it to receive the same message that says "In Radiance, they found eternal rest".
Step 4: Find the 3rd Shrine and Complete its Objective
- The 3rd Shrine can be located near the same location as the 2nd shrine that we just mentioned above. From the Abiding Defender's boss arena, head down the stairs on the right to reach a courtyard that has a tree at the center. Run up the slope and walk towards the runway on the right. You'll find a room that looks like a drainage with lamps hanging from the ceiling, you'll also find a group of Penitent enemies praying in front of the statue. You can kill them or just ignore them.
- Use the Orian Vow of Protection gesture in front of it to reveal the objective which is to "Illuminate 10 Holy Bulwarks to end their suffering"
- Find a nearby Umbral Flowerbed and plant a seed so you can use it to rest and respawn the enemy. Luckily, you won't have to go far since you can find the Holy Bulwark enemy just outside of the room of the shrine you just interacted with. Upon killing it with the Flickering Flail that is imbued with the Radiant Weapon spell, just rest at the Umbral Flowerbed to respawn the enemy.
- After killing the enemy 10 times with the Flickering Flail that is buffed with the Radiant Weapon spell, return to the shrine and interact with it to receive the same message that says "In Radiance, they found eternal rest".
Step 5: Find the 4th Shrine and Complete its Objective
- Shrine No. 4 can be located at Pilgrim's Perch. Fast travel to the Vestige of Blind Agatha and go to the area on the left, which is the room that was previously locked with an iron door that has a bell at the top. That door can be unlocked with the Pilgrim's Perch Key if you haven't unlocked it yet.
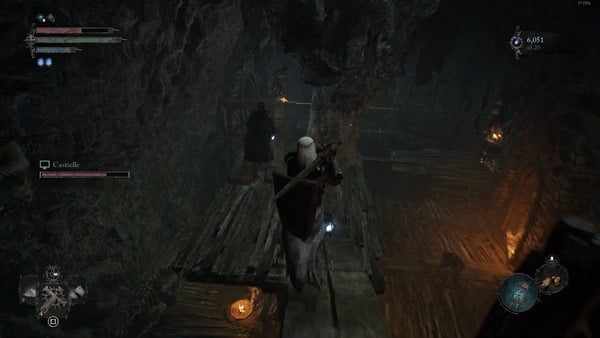
- Head further into the area towards the wooden platforms where you will encounter multiple enemies is where you'll find the shrine. Use the Orian Vow of Protection gesture to receive a message that says "Illuminate 10 Ardent Penitents to end their suffering"
- The Ardent Penitent enemy is a tall man who wears a spike bell on his head. You won't have to go far since you can find one that you can repetitively kill 10 times near the Vestige of Blind Agatha. You can find it just standing with its back facing you, making it easy to backstab it at first and then finish the enemy off.
- Defeat the enemy 10 times with the Flickering Flail that is empowered with the Radiant Weapon spell and then return to the shrine to interact with it. If done right, you'll receive the same message that says "In Radiance, they found eternal rest".
Step 6: Find the 5th Shrine and Complete its Objective
- The fifth shrine can also be located at Pilgrim's Perch, specifically at the boss arena of Scourged Sister Delyth. Start at the Vestige of Chabui and climb up the ladder that's opposite the vestige. The statue or shrine can be located just as you drop down to the arena, it's in front of the two Penitent enemies that are praying.
- Use the Orian Vow of Protection gesture to reveal the objective which is to "Illuminate 15 Avowed to end their suffering"
- There are two Avowed enemies that can easily be found just by the scaffolding of Skyrest Bridge, which is near the Vestige of Chabui. Kill the enemy 15 times with the Flickering Flail while the Radiant Weapon spell is active.
- Return to the statue and interact with it upon completing the objective before finding the last shrine/statue.
Step 7: Find the 6th Shrine and Complete its Objective
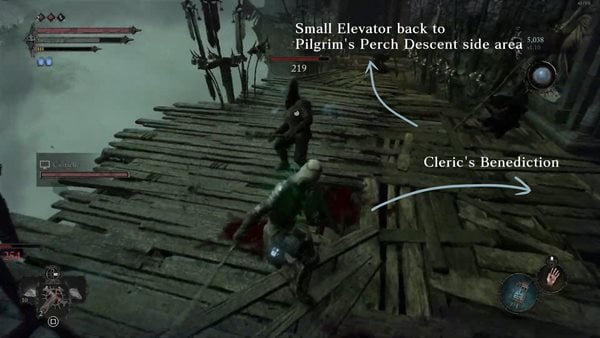
- The last shrine can be located at Pilgrim's Perch - Belled Rise. The shrine is inside a room where you can find a dead Pureblade that is sitting on a throne. This room is where you first find the Cleric's Benediction. When you reach the shrine, use the Orian Vow of Protection gesture to learn about the objective which is to "Illuminate 10 Pureblades to end their suffering".
- A good location to find and farm kill the Pureblade is at the Abbey of the Hallowed Sisters. But you can find the enemy at other locations such as the Path of Devotion or the Manse of the Hallowed Brothers.
- Kill the enemy 10 times with the Flickering Flail weapon that is imbued with the Radiant Weapon spell then return to the shrine and interact with it to complete the objective. By doing so a new message should appear that says "Seek the once-hidden shrine in the place where brothers dwell".
Step 8: Find the Secret Shrine to acquire the Illuminator Aubrey's Set
- The last step to complete the questline and to acquire the armor set is to find the location of the secret shrine. To find it, return to the Manse of the Hallowed Brothers and proceed to the area where you can find the stigma of Byron. You can find a guide below on how to find it.
From the Vestige of Brother Jeremiah, head outside and go up the path.


Head up the stairs to reach a walkway full of enemies. Clear the enemies while making your way to the end.


Once you're by the fountain, break the wooden structures by a doorway and continue on. Right before the next doorway, there is a broken part of the rails, use your Umbral Lamp to walk onto the grassy path.


Head down the grassy path until you read large double doors and a bench, there's a swarm of moths on the beach. Soulflay the Stigma to reveal Byron to be a part of this fragment, and receive 2 Umbral Scourings.

- On the left-hand side of the stigma, you should find a huge hole in the wall now. Inside, you need to defeat an Abbess and some Abiding Defenders. Fight the enemies and once you defeat them, check behind the Shrine of Aubrey to find the complete set that you can pick up from the ground. Apart from the armor set, you'll also acquire a new armor shader, Waxen.
Illuminator Aubrey's Gauntlets Set in LOTF
- Illuminator Aubrey's Helm is a piece of the Illuminator Aubrey's Set
- The rest of the set is composed of the following: Illuminator Aubrey's Armour, Illuminator Aubrey's Helm, Illuminator Aubrey's Leggings
Lords of the Fallen Illuminator Aubrey's Gauntlets Notes & Tips
- Arms are worn over the player's arms to obtain an increase of defense and resistance to the different types of damage. They also change their appearance as well when equipped.
- Notes and player tips go here...