- Lower Calrath is one of the Locations in Lords of the Fallen (LotF). Lower Calrath seems to be the remains of a district filled with houses and what might've been a busy village of residents. Now, however, nothing remains of what it could have been, save for burning buildings and desecrations, along with the abominations that now inhabit them. Calrath actually has two sections, the common area of Lower Calrath, and the wealthier Upper Calrath. In Lords of the Fallen (LOTF), players will get to explore a vast, interconnected world where they will journey across the worlds of the living and the dead. This page covers a full walkthrough and helpful guides for the Lower Calrath location in Lords of the Fallen.
- Please visit the Walkthrough page for Lords of the Fallen (LotF) for a detailed guide on the main story.
- You can also check our Game Progress Route page for Lords of the Fallen (LotF) for a summarized progression path.
- Visit the Lower Calrath Map for a visual aid in finding all Items, Shortcuts, and relevant markers.

General Information
Lower Calrath
- Previous: Fitzroy's Gorge
- Next: Upper Calrath A
- Bosses: Infernal Enchantress
- No. of Vestiges: 4 - Vestige of Sebastian, Vestige of Lydia the Numb Witch
Lower Calrath Map
NPCs in the Area
Bosses
Enemies
- Bringer of Stillness
- Corrupted Penitent
- Infernal Enchantress
- Mendacious Visage
- Proselyte
- Ravenous Fascinator
- Raw Mangler
- Remnant
- Ruiner
- Seared Soul
- Shrouded Remnant
- Shrouded Sparrow
- Trapper
- Umbral Egg
- Umbral Parasite
- Womb of Despair
Items
Weapons
- Blackfeather Ranger Axe
- Bow of the Convert
- Defiled Infantry Bow
- Fallen Lord's Sword
- Infernal Enchantress Flail
- Pyric Cultist Flail
- Rosamund's Sword
- Scale-Breaker
- Serrated Staff
- Skinstealer Spear
- Split Crossbow
- Sword of Skin and Tooth
- Tassara's Axe
- Wooden Dark Crusader Cross
Shields
- None
Armor
Spells
- None
Accessories
Runes
Items
- Ammunition Pouch
- Ammunition Satchel
- Briostone Trio
- Burn Cures
- Faint Vigor Skull
- Fire Salts
- Fire Ward
- Heavenly Vial
- Holy Salts
- Ignite Cure
- Manastone Cluster
- Purifying Balm
- Small Manastone Cluster
- Smite Salts
- Wither Salts
- Wither Ward
Upgrade Materials
Key Items & Other
- Antediluvian Chisel
- Cinder Arrows
- Cinder Bolts
- Infernal Enchantress Flesh
- Map of Calrath Slums
- Map of Lower Calrath
- Map of Upper Calrath
- Poisoning Knife
- Ravager Gregory's Rosary
- Umbral Scourings
- Vestige Seed
- Wheezing
Enemy Drops
- Briostone
- Briostone Trio
- Burn Cure
- Burn Resistance Balm
- Burn Salts
- Charmed Paw
- Corrupted Pilgrim Hood
- Enervated Vigor Skull
- Halsan
- Ignite Cure
- Infernal Enchantress Flail
- Infernal Enchantress Flesh
- Infernal Enchantress Helm
- Infernal Enchantress Skirt
- Large Manastone Cluster
- Minor Fire Salts
- Proselyte Gauntlets
- Purifying Balm
- Raw Mangler Axe
- Regular Deralium Nuggets
- Ruiner Helm
- Ruq
- Trapper Cap
- Trapper Crossbow
- Tumul
- Unripe Berries
- Umbral Vertebrae
- Vestige Moth
- Vestige Seed
- Wither Salts
Lords of the Fallen Full Lower Calrath Walkthrough
The Burning District
After heading out the doorway from Fitzroy's Gorge, you'll find yourself in Lower Calrath, in what looks like a burning village. Move forward along the path to eventually find a Stigma to Soulflay on your right. You'll witness a Dark Crusader steeling himself with a mantra before walking away. You'll get the usual two Umbral Scourings and the Wooden Dark Crusader Cross for listening in. Move forward until you can't anymore as your path is blocked by corpses in stakes burning in the fire. If you transitioned to Umbral to Soulflay the Stigmas, you can cross the bridge on your right. Otherwise, hold up your Umbral Lamp, but be careful of the Enemies that might attack you as you cross.

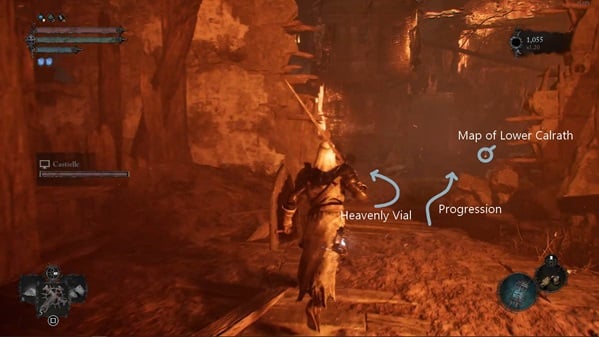
At the end of the path, you'll find yourself inside a burning building with a large staircase. Tucked into a small section to the right of the staircase are three Fire Wards ironically on some burning wood. Head up the stairs to find and activate the Vestige of Sebastian. Use it to transition out of Umbral, rest, or upgrade yourself as necessary. From the Vestige, head out through the gap on the wall and then turn left. Head down the wooden planks to find a Heavenly Vial on a corpse near a banner. Head back up and then follow the path on the other side to jump and grab the Map of Lower Calrath on the raised wooden planks. Move forward and go down from the planks to get some Smite Salts in the corner. When you're ready, follow the path to the right for a Boss fight against the Infernal Enchantress.
Firefight with the Enchantress
As always, a teammate would be very useful here to swap aggression with as necessary. When you start the fight, it will be a good idea to instantly search for some Umbral Parasites that are empowering her and making her stronger. Until you get rid of them all, she will be surrounded by a veil of flaming vortex which will render you unable to get close to deal damage with your melee Weapons. Spells might be fair game though. Once the Umbral Parasites are gone, weave your attacks in along with some dodging. She attacks with some long-ranged fire attacks so don't rest on your laurels even when you've gained some distance.

Whenever you get some combos in, or she notices that you've been near her for quite a while, she'll start pushing you away with a blast of fire that hits everywhere around her. Make sure to not be too greedy when you find a window to attack. Being a mage-type Boss, she's not as fast or positionally difficult as other Bosses, so make sure to keep an eye out for opportunities to deal a lot of damage on her from behind with Grievous Strikes. Keep at this strategy until you vanquish her and you'll be rewarded with the Infernal Enchantress Flail, Infernal Enchantress Helm, Infernal Enchantress Flesh, and a Vestige Seed.
Where There's Smoke
A couple of steps before the huge pyre is an Umbral Flowerbed you can use for a Vestige Seedling. If you can, however, try to hold out as you'll have some respite coming up. Past the huge pyre, there's a little alley in the corner to the right that leads to the Magma Ring on a charred corpse, past some breakable jars. From there, move forward across to some stairs. At the top, you'll be greeted by a Raw Mangler. There will be another one further on the path to the left, along with some Seared Souls. This path leads to a shortcut gate that doesn't open from your side for now. Hidden to the left of the gate by the burning plant is the Pyric Cultist Flail you can pick up from a corpse.

Head back and move forward along the opposite upward path. As you do, look to the right to find a wooden pathway leading down. If you follow it you'll find yourself on a narrow wooden bridge that's broken. Use your Umbral Lamp to cross it to the other side. There's another Raw Mangler there so be careful as you're vulnerable while holding the lamp up. After disposing of him, keep moving forward with your Umbral Lamp as you cross the rooftops. You'll eventually find yourself in an upper area of the burning building where the Vestige of Sebastian lies. Kick down the ladder to make a shortcut for yourself to the Vestige for your well-deserved respite.
Head back on the upward path, being careful not to fall as you use your Umbral Lamp, and head all the way up this time. You'll be greeted by a Trapper from afar. As you get near the house on your right, a Rhogar Hound will try to get the jump on you. You can bypass the small gate past the hound with your Umbral Lamp. You might as well transition to Umbral completely here to Soulflay the Umbral Belly just past the gate. Doing so nets you the Grievous Ring. Be careful of the Shrouded Sparrow that jumps you here if you do transition. You can follow the path around the house to another small gate you can bypass to get the jump on a Raw Mangler also waiting for his turn.

Follow the path forward going up a ridge. You should find an Emergence Effigy shortly on your left if you want to transition back to Axiom. Be careful of the Seared Souls that ambush you right as you do. A bit past the effigy is a corpse carrying an Ammunition Satchel and two Manastone Clusters. Ahead of you will be Proselyte past the wooden barricades. Be careful as this is a very tight area, which makes his barrage of fiery nails really potent and can shred your health down to nothing when you get in its range.
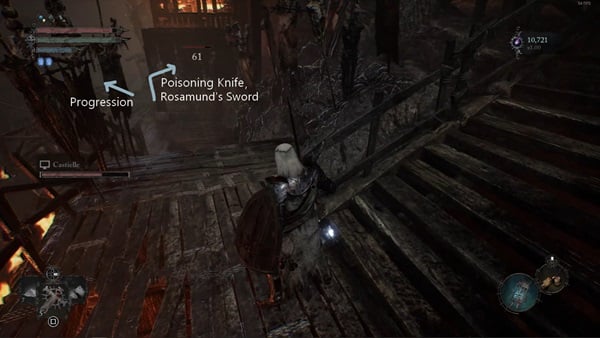
Once you've taken care of him, proceed under the tunnel ahead of you. Shortly after you emerge to the other side, you'll find another Umbral Flowerbed on your left if you want to set up camp here. Otherwise, follow the path down the wooden planks. When you reach the broken bridge, you can turn right to find a Raw Mangler trying to take a break. Keep heading up the stairs and then follow the narrow path to the right in front of the small house to find a Poisoning Knife. Transition to Umbral here and then head back to the stairs. Before you continue heading up, Soulflay the target just by the stairs going down. Proceed to the top of the stairs to find an Umbral Tumor here in place of the large fire covering the wall. You've already Souflayed one target needed. Move past the tumor to find the other one above you and Soulflay it to destroy the tumor. Proceed past it to a rooftop with an Umbral Belly guarded by a Womb of Despair. Soulflay it to pick up Rosamund's Sword.
Head back down to the broken bridge and Soulflay the target on the platform and allow yourself to cross. If you look up you'll see a Shrouded Sparrow perched on the other side waiting for you. Once you're across, drop to a narrow landing to your left. Be ready for Enemies that will attack you hiding in the alcove. Break the wooden boards in the corner here in the alcove and follow the narrow path to some Cinder Arrows. When you head back up you'll find an Emergence Effigy you can use to exit back to Axiom. Head up the inclined wooden planks to your left to move forward.
At the top, you'll find a minor Infernal Enchantress. Be careful of her explosion attack when her health gets low, or if you get too close. If you die here and transition to Umbral involuntarily, you'll also have a Bringer of Stillness to contend with. Once you're in the clear, you can move forward a bit and make a U-turn to your left to get the Bow of the Convert on a corpse by the wooden fence. There are locked double doors nearby that you'll need the Sunless Skein Key to open.
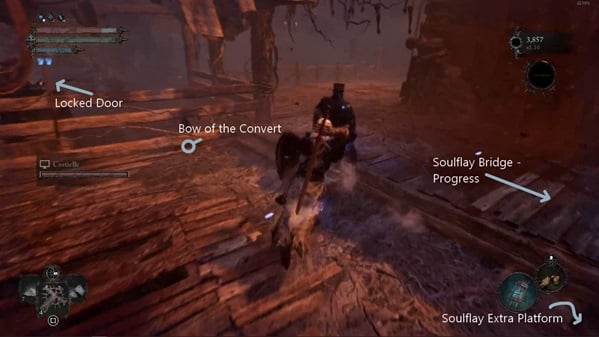
If you head back and go straight ahead you'll find another Soulflay target across another gap. If you do, you'll notice that the bridge that gets pulled out for you doesn't quite reach you. Don't attempt to jump it. Instead, you can head down the rooftop to the right to get the jump on yet another Raw Mangler taking a break. If you're in Umbral, you can farm some Umbral Eggs further to the right if you would like to. Head to the other side of this lower ledge to find another target to Soulflay. Doing so will bring a platform closer to the bridge so you can cross. Head back up and do so. There's another Emergence Effigy waiting for you on the other side.
Head up the narrow path to your left. Be careful as you emerge as you'll be greeted with firebombs thrown by the Seared Souls across the gap. Dash across the narrow wooden planks in front of you and head down to rush them. At the end of this ledge are four Small Deralium Fragments on a corpse that's sat up. Head back and progress forward through the planks. At the end of it will be a ladder you can push down, and an Umbral Flowerbed right at the doorway.
If you head down the ladder, you'll immediately be at odds with a couple of Raw Manglers and Rhogar Hounds. One of them is empowered by an Umbral Parasite so be careful and be thorough. If you head past the ladder and down the wooden path, you'll find The Iron Wayfarer before the wharf. If you talk to him he'll just comment on the state of Mournstead and how all this resulted from a "rune." A bit past him are some breakable objects hiding the Ornx Rune. Turn around and find your way to the tunnel under the bridge to find a Stigma. Transition to Umbral and Soulflay it to witness someone comforting a little girl named Elianne with a memento. Doing so will reward you with an Odd Stone in addition to the usual two Umbral Scourings.

From there you can drop down to a lower section where there'll be Enemies waiting for you. If you're in Umbral, one of them is a Womb of Despair which can drop good rewards when you kill it. The item near the stairs is just a Ravenous Fascinator you can Soulflay for a Charmed Paw and a Vestige Moth. There's a little corner down here where you can find the Dark Oath Armour Tinct. It will be under some Umbral Eggs if you're still in Umbral. Head up the stairs to find an Emergence Effigy you can use to transition back out to Axiom. Follow the path from there to jump back to the tunnel under the bridge. This time, turn right along the downward path beside a house. As you go down, look to the right for two Regular Deralium Nuggets on a corpse while being careful of the Trapper on the other side of the fence. Head back up, cross the tunnel back to the other side, and head down to the wharf to deal with it, alongside two Raw Manglers coming from the right.
Head up the wooden platforms through the stairs on your right, along this side of the house. At the top will be a Proselyte you'll have to deal with. Across the stairs you just climbed will be a wooden bridge that's raised up, so you can't cross it for now. Be careful using your Umbral Lamp to check things here as a Bringer of Stillness can use the opening to pull you to the Umbral unwillingly. Turn left onto a narrower bridge you can cross instead. On the other side will be four Small Deralium Fragments. Head back across and down the stairs and head to the edge of the wharf to find the Defiled Infantry Bow. If you turn around and look to your right (to your left if you're just heading down) you'll find a gate you can open. This is the gate you couldn't open yet, that you find up the stairs from where you defeated the Infernal Enchantress Boss. Open it from this side for a little shortcut. When you're done here, head back all the way and up the ladder to the doorway with the Umbral Flowerbed.

Enter the doorway and head up the stairs. Pick up the Map of Calrath Slums amidst some charred corpses. Turn around from here to find a short set of stairs that take you up to the Vestige of Lydia the Numb Witch which you can activate and use as necessary. When you're done, head back down to the room with the dining table and this time turn left and enter the doorway past the table. To your immediate left, you'll find Drustan sitting down with his helmet on. He'll tell you that someone with a mustache directed him here on the search for his kidnapped brother. Talk to him again, you'll get the Wheezing Gesture. If you talk to him again you'll be prompted to hand over some Unripe Berries to him to help him out.
Head back inside and this time head to the doorway past the dining table across to the left. If you look up to the ceiling above you can spot a ladder you can possibly kick down later on. Head down the stairs here to find the Prole Hat, Prole Garb, Prole Wrappings, and the Prole Trousers on a corpse amidst the breakable objects. If you head further down you'll find some Seared Souls and a large hole in the wall. You'll have to drop here but do so very carefully and try to aim for a spot that's safe from the mines. Touching them will result in a small blast.
This is Fine
After you carefully avoid them and head out of the alley, you'll be greeted by a Trapper and a Raw Mangler. From here head on the path straight ahead first but head up the raised ground on your right. You'll be greeted by a Seared Soul that'll use fire attacks against you. Head to the left of the house and into a narrow path where you can pick up two Ammunition Pouches and Small Manastone Clusters. Keep going to pick up the Guardian Armour Tinct from another corpse. When you emerge, you'll see a fallen tree blocking your way to the right, as well as some stairs going down.

Head back toward the alley where you came from first and then turn right to take the other path. The path will end with a wall that you can bypass with the Umbral Lamp. Behind it will be some stairs leading up to an Umbral Flowerbed you can plant a Vestige Seedling on. On the ledge above the flowerbed is a chest containing some Fire Salts, Holy Salts, Wither Salts, and the Sword of Skin and Tooth.
Head back out of the wall and head up the stairs to your right. This takes you up to the higher levels of the burning houses. Jump down here but be careful of Enemies. The areas in this section are quite small so be careful of fire explosion attacks and fire breaths. Head down to a lower floor to deal with a Raw Mangler. Head down another floor lower to find the Scale-Breaker. The wall here with a hole can be bypassed with the Umbral Lamp or by transitioning to Umbral. Outside, you can grab three Fire Wards.
Head back inside by bypassing the wall again and then find your way back up. Move forward across the stairs and jump over the gap to the next house, and then cross the planks to the next one as well. There'll be a doorway further in blocked by breakable wooden objects. As you enter after breaking all the wood, head further in. Again, this will be another tight area so be really careful of the Enemies' fire attacks.

As you emerge across the short plank to another house, this section is going to be on fire but there are noticeably fewer fires if you transition to Umbral so you can go ahead and do so to be able to navigate better. There will be a Stigma to your immediate left. Soulflay it to witness someone cowering inside the house, afraid of a looming dread that seems to have enveloped the district. Doing so gets you the usual two Umbral Scourings. Past the Stigma will some Cinder Bolts on a corpse. Head back where you came from and turn left to cross the parallel planks. Keep moving forward to find Adyr's Mark Ring hiding behind some breakable boxes. Turning left afterward and dropping onto the street will take you to the fallen tree from before.
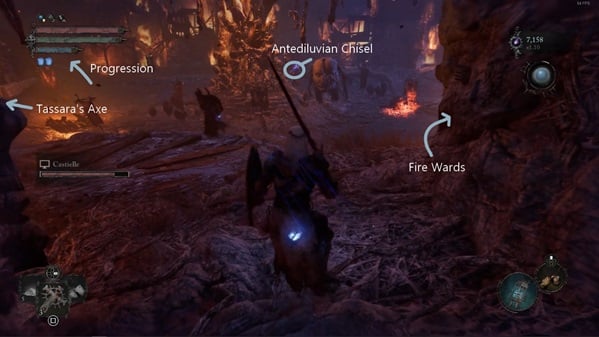
Head down the stairs to an open area with a large burning tree. You'll find several Enemies here including a couple of Seared Souls, and a minor Ruiner. If you're still in Umbral you'll also have a Mendacious Visage and a Shrouded Remnant or two to contend with so you might want to first head back to a Vestige or a Vestige Seedling and rest to transition back to Axiom. Defeating the Mendacious Visage can reward you with good boons.
After you've cleared the area of Enemies, you can Soulflay the Umbral Belly on the large tree to pick up the Antediluvian Chisel. On the same side where the Umbral Belly was, you can pick up three more Fire Wards amidst some impaled corpses. Past the large tree, there's a little alley to the left where you can pick up Tassara's Axe.
Head up the partially buried stairs to find an Umbral Flowerbed to plant a Vestige Seedling on. Follow the raised wooden path to an Emergence Effigy you can use to exit out of Umbral. After the next inclined plank on the roof, head to the left to kick down a wooden wall and make a shortcut leading to the upper floors of the burning houses you explored before. As you head up the top rooftops, turn right and head to the edge to enter a doorway hiding two Regular Deralium Nuggets inside as well as another Umbral Flowerbed.

Moving Up
Head back onto the center of the rooftops and cross the narrow white bridge. Climb down the ladder here to find yourself on the other side of the fallen tree from before. You can move on ahead or go up the stairs to your right for a little detour. Transition to Umbral to climb up the short ladder and deal with two Raw Manglers. You'll have to be quick as you navigate your way up here, as you'll be bombarded by some explosions no thanks to the minor Infernal Enchantress below you. Inside, there are two more Regular Deralium Nuggets on a corpse. As you head out the other side, you'll probably be bombarded again so make sure to rush out. Push the ladder down so you have a way back up from the ground level. Rush past the next wooden ledge to dodge another bombardment.
Follow the path inside to an Emergence Effigy. Head on down the stairs to the ground level where there's a minor Infernal Enchantress leading some Seared Souls and Rhogar Hounds. This is where the previous path was heading, so the detour allows you to progress without fighting them if you don't want to. There's a cracked wall right behind the stairs you went down with. You can bypass it with your Umbral Lamp to pick up the Serrated Staff and plant a Vestige Seedling on an Umbral Flowerbed if you need to. Outside, if you want to rush by and get it, or if you choose to clear out the Enemies, there's an Animated Vigor Skull inside the tent just before the turn leading back toward the fallen tree.

Otherwise, head up the sloping path just outside the Umbral Flowerbed to move forward. There's another Proselyte guarding the steps here, and similar to a previous situation these are the ideal dimensions for his flaming nails attack, so be nimble and be ready for it. Inside the structure behind him will be a ladder leading up to a higher area. Before heading up, exit to the wooden terrace on the other side and pick up the Purifying Balm from the charred corpse. Follow the path to the right to reach a ladder you can push down that leads back to the dining table and the Vestige of Lydia the Numb Witch at the alehouse.
Head up the wooden planks to the right. As you emerge on the rooftops, be careful of the Raw Mangler waiting to attack you. Carefully claim Ravager Gregory's Rosary from the impaled corpse here. Jump into the hole on the wooden floor inside the burning house to the right of the impaled corpse. When you land, you should see a smaller hole in the wooden wall to your right. Carefully walk on the beam to reach the Split Crossbow. The Vestige of Lydia the Numb Witch is just below you if you need to use it.
Find your way back to Umbral Flowerbed behind a cracked wall and head up the slope and onto the top of the stairs again. Head up the ladder this time. Break the wooden barrels when you reach the top for two Faint Vigor Skulls. Hold up your Umbral Lamp to the back wall here to bypass it to a secret room, which has another Umbral Flowerbed, as well as a chest containing the Lava Burst Spell. Return to the previous room and head up the ramp to kick the third Raw Mangler you've caught taking a break so far off of the wooden platform. Past the breakable objects to the left is another who'll try to avenge him.
Afterward, cross the narrow bridge past him. Once across on the other side, transition to Umbral to get rid of some of the fires in this building. You'll have another Womb of Despair to deal with, but you'll be rewarded with the Items it'll drop, as well as an Umbral Belly you can Soulflay here to get a Saintly Quintessence. Head down one floor to find a large fallen bell. Carefully walk past it to find the Fallen Lord's Sword on an impaled corpse, almost hidden by the flames if you're not in Umbral. Head down one more floor to find a ladder in the square hole in the middle of the floor, only if you're in Umbral. Climb down the ladder and then head out the opening on your right to get three Wither Wards at the edge of the broken staircase. The opening on your left just leads back to the stairs leading up to a Proselyte, but was hidden from your view by the fires in Axiom.
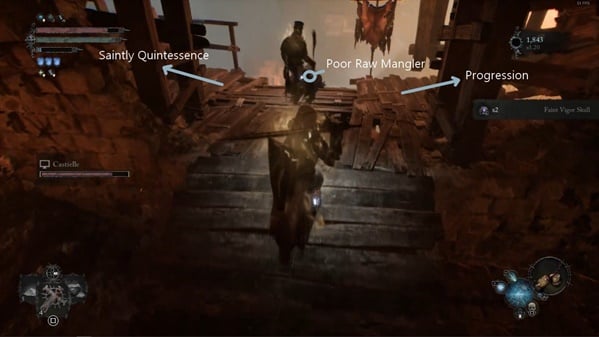
When you're ready, head all the way back up the structure and cross the narrow bridge back. Take the path to the opposite side this time to find some Burn Cures and Ignite Cures. Head inside the building where a Raw Mangler and Trapper are waiting for you. Head up the stairs and you'll notice a gap that's not allowing you to head up further. Instead, head back down the landing below you and transition to Umbral to find the ladder up. Pick up the Blackfeather Ranger Axe hiding behind the stacks of breakable barrels. Continue up the stairs to emerge in another burning street. Head to the left to find an Emergence Effigy just past the stairs, and an Umbral Flowerbed further at the end of the path. Use them as necessary.
Across the stairs is an opening on the broken wall. Head to it and turn right to find the Ring of Nourishment on a charred corpse. The path on the other side is guarded by another minor Infernal Enchantress and her own team of Seared Souls. Deal with them and then break the carriages in front of the opening. Head down the stairs leading to Upper Calrath and get ready to face the Spurned Progeny.
After Sunless Skein
After you acquire the Sunless Skein Key, you can now enter a section of Lower Calrath that was initially locked off. Teleport to the Vestige of Hooded Antuli and then looking away from the Vestige, follow the path to the right leading to the locked door. Use the Sunless Skein Key to open it and emerge to a new of Lower Calrath. Move forward on your right and head down the wooden ladder to get to ground level. You'll be faced with a Raw Mangler here along with a Rhogar Hound. Turn left toward where the Raw Mangler started and pick up the Regular Deralium Nuggets.
Move forward on the other side. Head down the stairs to the right, looking for a chance to head up to the left as you go, to pick up two more Regular Deralium Nuggets. Head all the way down the stairs and transition to Umbral when you're ready. You'll have to deal with a minor Mendacious Visage here guarding an Umbral Belly on the tree. Soulflay it to pick up a Saintly Quintessence. There should be an Emergence Effigy nearby if you need to use it to exit back out to Axiom. Turn around to find a wooden bridge you can kick down to form a shortcut, which is the one you saw near a Proselyte, leading to the section where you bumped into The Iron Wayfarer.
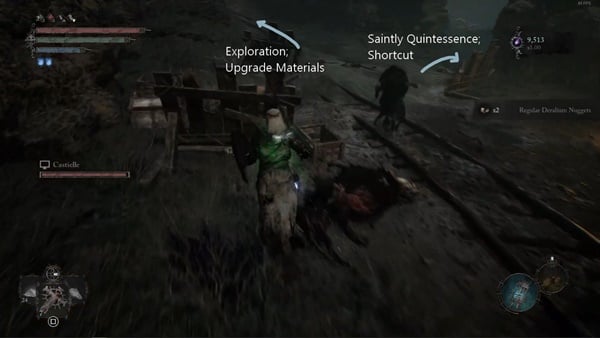
Head back up the stairs and hang a right to follow the tracks this time. You'll encounter a minor Infernal Enchantress you'll have to deal with, along with two Rhogar Hounds. Keep following the path into an archway. As you enter it, you should find some breakable objects to your right that lead to the side of the bricks. Break them, follow the path they reveal to an underside, and turn right to grab some Burn Cure. There'll be an Umbral Flowerbed here as you turn back around. As you head up the stairs to the right, be careful of the Raw Mangler and Rhogar Hound waiting to ambush you. When you reach the next set of stairs, you'll see a ladder to the right. If you head down and open the door there with the Sunless Skein Key.
Climb back up the ladder and head back down the underside. Turn right this time to emerge outside. Proceed to an open area to your right that will be partially filled with lava. A Skinstealer has made this area his turf so you'll have to deal with him. Turn left to circle around a smelting structure to find the Skinstealer Spear amidst some skinned corpses. Cross the wooden bridge to the other side and ignore the wooden steps first to grab some Fire Salts. Head up the wooden steps now and you'll find yourself on the platform where you were previously. Drop down to the open area on your right to climb up the ladder. Climb up the next ones as well and then circle around the structure until you see some large ropes. There should be a gap you can enter in between them to pick up three Regular Deralium Nuggets, four Small Deralium Fragments, and some Large Deralium Shards.
Lower Calrath Map
Lower Calrath Videos
Videos Related to this Location
 Anonymous
There is a missing Tinct. GAURDIAN. Located here behind an umbral hidden wall.

 Anonymous
Near the enchantress inside one of the tents you can pick up the shield "Garish Display"

 Anonymous
The entire part about the Sunken Skein is unnecessary on this page as that section isn't even available for another few chapters, no clue as to why its even here, very confusing.

 Anonymous
Any idea how to drop the ladder to the left of the Numb Witch vestige, I presume it allows you to get the item on the beam right atop the vestige.

 Anonymous
In the chapter "Where there's smoke", after the portion where you run past 3 Seared Souls shooting fire balls at you and you knock down a latter. The walkthrough mentions the flowerbed by the gate, as if this is a spot to be considered for a seed. That's a missleading advice, right inside that gateway legit up the stairs in the very same room there's the Vestige of the Numb Witch. Please add it to the walkthrough to unlock that vestige before heading down the latter. So people don't waste their seeds on a flowerbed for nothing.

 Anonymous
There's a garish display in the tent by the minor enchantress that you bypass.


After Sunless Skein:
I'm backtracking all the locations before I finish the game and I found a red shining Catalyst like thing hanging in the tree. Teleport to the Vestige of Hooded Antuli. If you use the Sunless Skein Key, you can enter a section of Lower Calrath that was initially locked off. It is on top of the building where the skinstealer walks. Its a Hand with long fingers and a red blink puls amitting from it. Any Idea what it is? No Lock on or Lantern grap possible.
0
+10
-1